By connecting Raspberry Pi to an IP camera with simple steps, you can use Raspberry Pi to store the security camera video footage to external HDD or remotely live view, which is a budget-friendly solution. IP cameras usually use NVR for video file recording and remote viewing. In this case, it is equivalent to using Raspberry Pi to realize the function of NVR. At the same time, you can also experience the fun of DIY in it!
When you try to link the pi to the IP camera using this tutorial, the following data needs to be noted in advance.
Components Needed
In order to make a Raspberry Pi IP camera viewer, you require certain items:
- Raspberry Pi
- Keyboard
- A monitor
- IP camera
- Wireless adapter
Raspberry Pi: First of all, you need Raspberry Pi itself. There have been several generations being released, including Pi model A, model B, A+ and B+ models, Pi 2 model B, and the latest Raspberry Pi 3 model B.
Keyboard: Then you require a keyboard for the Raspberry Pi IP camera. Power is required which is provided by a Micro USB.
Monitor: To view the live video from a Raspberry Pi IP camera, you will need to attach a Raspberry Pi security camera monitor. This can be an HDMI or VGA model.
IP camera: A wireless security camera or PoE IP camera is required to capture your images and videos. The higher the quality of the camera, the better the images and video quality will be.
Wireless adapter: Finally, a wireless adapter is required to ensure that the whole Raspberry Pi security camera setup process runs smoothly.
7 Simple Steps to Make a Raspberry Pi IP Camera Viewer
The following are 7 simple steps to learn how to connect your Raspberry Pi to an IP camera. By transmitting IP camera's stream to the Raspberry Pi in real time, you can turn your Raspberry Pi into an IP camera viewer.
Quick Navigation:
- Install a screen or monitor for your Pi.
- Install Raspbian OS or NOOBS for your Pi.
- Set the WiFi network connection.
- Reboot to test if the WiFi is working properly.
- Get the IP camera username, password and IP address.
- Install a suitable video player software.
- Access the video stream of the IP camera.
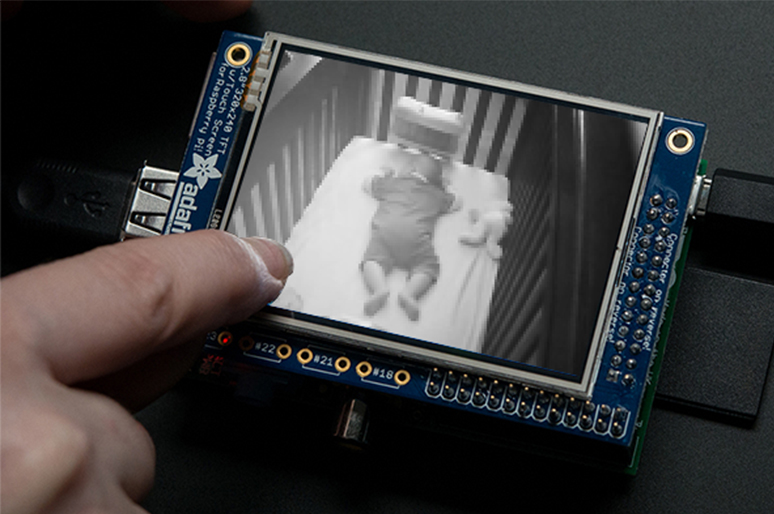
Step 1.Install a screen or monitor for your Pi.
Select and install a screen for your Raspberry Pi surveillance camera so that you can view the camera feed on it.
You can pick the perfect LCD or touchscreen compatible with the Pi from Amazon and other online stores.
Depending on your budget and needs there are a variety of options here, if you are on a tight budget, you can use a small size screen. Of course, if the budget is sufficient, you can try new features such as the touch screen, or choose a large screen to have a better IP camera live viewing effect.
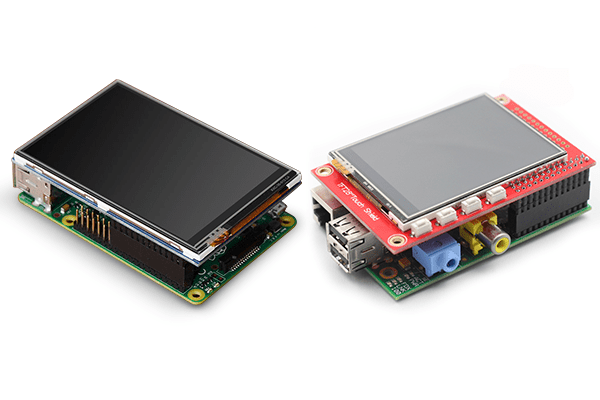
- Screen brand: Adafruit PiTFT, NeoSec, Tiny
- Screen size: 3.5 inches, 5 inches, 7 inches, 11.5 inches (We recommend that the screen size is not less than 3.5 inches to ensure a good preview effect).
- Other features: e-ink screen, touch screen
- Buy on: Amazon, eBay
We don't recommend e-ink screens because, in our experience, their refresh rate is usually too low and they don't have enough colors.
Touch screen is a cool new feature that you can try on a budget, but I want to make it clear that touch screen is not a must-have option in this project.
Step 2. Install Raspbian OS or NOOBS for your Pi.
Install Raspbian, the officially supported Raspberry Pi operating system, for your Pi. Or you can use NOOBS, a simple Raspbian installer to help you set up the raspberry Pi IP camera software.
To install Raspbian:
-
Download the Raspbian CD image on your computer, both Mac and PC.
-
The Raspbian CD image is compressed, so you will need to uncompress it.
-
Download the CD-ROM writer, insert the microSD card, and write the CD-ROM image on your computer.
- For MAC users, please use the program that comes with your system.
- For Windows users, please use Win32 Disk Imager.
- For Linux users, please use Etcher.
-
Insert the microSD card into the Pi and start it up with the default username and default password of Raspberry Pi.
Or install NOOBS:
Installing NOOBS may be a simpler operation, and you can even purchase a SD card with NOOBS pre-installed.
If you want to install NOOBS yourself, here are some steps to guide you.
- Download NOOBS and unzip it. The NOOBS file you downloaded is in .zip file format, so you have to unzip it first.
- Insert the SD card into your computer and format it to FAT.
- Simply drag the NOOBS file to the newly formatted SD card. Note that it is the uncompressed file.
- Simply insert the SD card into your Raspberry Pi and boot the disk. After booting to NOOBS, you will see a menu where you can select the operating system you want to install on the Pi.
Step 3.Set your Raspberry Pi IP camera to WiFi network connection.
Then your Raspberry Pi IP camera will need an Internet connection. It is best to set up WiFi on it so that you can run your Pi without a monitor, and you can use the IP address, username and password to make a remote SSH connection.
To set up WiFi for your Raspberry Pi, you will need to connect your screen, keyboard, mouse, and WiFi adapter to the Pi, and then log into your terminal. Set up the adapter, then enter your WiFi network information so the adapter knows how to connect to WiFi. If you have questions, you can turn to the Raspberry Pi forums for advice.
Step 4. Reboot to test if the WiFi is working properly.
Use the command to reboot your Pi and test to see if your Pi is actually WiFi enabled.
sudo reboot
Step 5.Get the IP camera username, password and video IP address.
Assume that your IP camera is already in proper working condition. Get the username and password of your Raspberry Pi IP camera, they are used for authentication when accessing the video stream on the IP camera in step 7.
If your IP camera is newly purchased, here are what you need to do.
- Turn on the camera, according to the instruction manual.
- Open the phone App and use the IP camera to scan the QR code on the phone screen according to the instructions. Perform binding.
- If you are using a computer Client, follow the instructions and use the IP camera to scan the QR code on the computer screen to bind.
- Set the WiFi password according to the instructions to make the IP camera work properly.
If you have forgotten your password, the only way is to reset the IP camera to the default password. You can usually find it on the back of the camera or inside the user manual.
You can get the video IP address of the IP camera in the mobile App, or the Client on the computer.
Step 6.Install a suitable video player software.
Select a suitable player to use as a Raspberry Pi IP camera viewer. There are many video playing software on Raspberry Pi, here we recommend some common ones for you to choose. Note that you should choose one that can play video based on IP address, or one that can play video based on RTSP address.
Commonly used Raspberry Pi video player software recommended.
- VLC Media Player
- KODI
- OMXPlayer or MPlayer
Install VLC Media Player
Here's the command to install VLC Media Player.
sudo apt install -y vlc
VLC Media Player is one of the most commonly used multimedia software in the world. In most cases, Windows PC users prefer to watch videos on VLC Media Player. However, this application supports Linux environments that are just as powerful as the Windows operating systems. It can even play 4K Ultra HD videos; but you have to watch out for the lag problem.
Install KODI
Here's the command to install KODI.
sudo apt-get update sudo apt-get install kodi
With a rich selection of plugins, KODI is one of the most famous and widely used media players for the Raspberry Pi. KODI's main purpose is to run local as well as web-based media files on a larger screen. Over time, with frequent updates, this media player began to attract the attention of Raspberry Pi users worldwide.
Install OMXPlayer
Here's the command to install OMXPlayer.
sudo apt-get install omxplayer
If you are using the official Raspbian operating system, then OMXPlayer is already included in the system. Even if you don't have Raspbian or you have an older version of OMXPlayer, you can easily download and install it on your Pi 3. Please note that OMXPlayer does not have a user interface, which means you need to use some command line code to make it play videos.
Step 7.Access the video stream of the IP camera.
Start accessing the Raspberry Pi security camera video stream from the player. Make sure to change the IP address, username and password to match your IP camera.
Remember the three things we got in step 5 above? The username, the password and the IP camera's IP address.
Now we are going to access the IP camera's video stream on the Raspberry Pi by using these three things.
For Video player with user interface(for example VLC Media Player)
- First start VLC: Start menu -> Sound and Video -> find VLC Media Player
- Then set the address of the video stream: Go to Media >> Open Network Stream >> Network
- Input the RTSP url.
- The RTSP URL should be:
Main Stream: rtsp://admin:password@ip_address:554//h264Preview_01_main Sub Stream: rtsp://admin:password@ip_address:554//h264Preview_01_sub
For Video player without user interface(for example MPlayer)
Simply type in the command below to start viewing your camera feed. Change the IP address, username and password to match your camera:
mplayer fbdev2:/dev/fb1 "http://192.168.1.9:90/videostream.asf?user=USERNAME&pwd=PASSWORD"
Note that for different software, their command line code is also slightly different.
Done! After a while you can see the live Raspberry Pi IP camera stream. If that fails, try installing MPlayer again or check if the IP camera network is working properly.
Use Raspberry Pi as an IP Camera Sever
Most IP cameras require support of a central network video recorder (NVR) to handle the recording, video and alarm management.
Fortunately, you can choose to install the following software commonly used on Raspberry Pi to implement the server function.
To use the Raspberry Pi as an NVR with an IP camera, our software recommendations are as follows.
1. Shinobi
Shinobi introduction: Shinobi as an open source CCTV solution is developed using Node.js (server-side JavaScript). The project is very active and has two versions: Community and Pro, however, you can also use the Pro version for personal use.
Installation requirements: Your camera should be an IP device and should be ONVIF compliant.
Supported features: Recording and IP camera management.
2. MotionEyeOS
MotionEyeOS Introduction: MotionEyeOS, a free open-source application, allows you to turn a Raspberry Pi with a camera into a home video monitoring system, where the photos and videos can either stay on your device (and home network) or, if you choose, be uploaded automatically to a cloud-storage service such as Google Drive or Dropbox.
Installation requirements: The protocol of the IP camera should support RTSP.
Supported features: Frame rate, screen text, automatic screenshot/recording, motion monitoring, etc.
How to set up MotionEyeOS?
- Download the image file and use Win32DiskImager to write the image.
- Initial IP configuration default DHCP, you can go to the router management page to find the device IP. The default device name is ‘meye + random string’.
- After you find it, browser directly accesses the LAN IP. The default administrator username is ‘admin’ and default password is empty.
- Click the plus sign in the upper left corner to add a camera, select IP camera in thedrop-down menu, and choose RTSP as the protocol.
- Fill in the RTSP stream address and the authenticated user name password.
3. PiNVR
Introduction: PiNVR allows users to view, record and control cameras using Raspberry Pi. Its basic version is free for personal use, no registration required.
Installation requirements: Support for ONVIF-compatible IP cameras.
Supported features: Recording and IP camera management.
Note: Please note that the three solutions described above can be suitable for personal DIY solutions, but they are not recommended for long-term video surveillance, home security or corporate use. Because the GPU performance of Raspberry Pi is very limited, and long-term operation will make the chip generate a lot of heat. If you install a fan cooler, it will generate a lot of noise. Also, the operation is not stable.
Editor's Choice:
We recommend customers with home security, enterprise security needs to choose mature NVR products. We recommend the Reolink NVR, which is easier to set up, has a more user-friendly interface, and has a comprehensive after-sales service team and warranty policy for 2 years' limited warranty.
Connect IP Cameras to Raspberry Pi: Things to Consider
When you decide to connect IP cameras to Raspberry Pi, make sure you have the proper equipment. You should also ensure that the IP address you record and use is correct. You can check this through the command prompt in Raspberry or through the main Raspberry interface that displays your connection information.
To turn off your Raspberry Pi, avoid unplugging the power cord. You can use the following command:
pi@raspberrypi~sudo shutdown now
Is Using a Pi as a Security Camera the Best Option?
"There are lots of ready-made IP cameras on the market and I was just wondering whether these might be a better option (practically or cost-wise)."
If you're willing to go through the learning curve and have the required equipment at hand, it's a good try to set up your own Raspberry Pi security camera.
However, if you are looking for a Raspberry Pi network camera solution for extra HDD storage or distant monitoring (200 feet or so), there could be easier solutions.
For example, the PoE security IP camera can be connected to the NVR for 2TB and more storage and placed up to 220 feet away with a simple Ethernet cable connection.
And after you connecting the NVR system to a monitor, the live view will just appear – No software or IP camera configuration needed.
Issues with a DIY Raspberry Pi Security Camera
One of the best parts of a Raspberry Pi surveillance camera is low-costing. Raspberry Pi, a tiny, affordable computer, can be used for video monitoring along with a cheap IP camera.
However, there are also downsides of this the Raspberry Pi IP camera system.
1. Blurry Images
The Raspberry Pi IP camera recording is a little fuzzy, compared to videos/images of HD security cameras, which could reach 4MP, 5MP or even 4K images these days at an affordable price.
2. No Multi-Screen Viewing
Unlike the NVR security camera system, the Raspberry Pi security camera kit can't be manipulated altogether. That's to say, through the Raspberry surveillance camera monitor, you can't see several cameras at the same time.
3. Complex Installation
The whole installation for Raspberry Pi based security surveillance camera is far more complicated than that of the PoE or WiFi IP cameras, which are real plug-and-play.
To make the installation even easier, many people have switched their IP camera on Raspberry Pi to the battery powered wire-free cameras which can be setup for live view and motion detection in 5 minutes!
Final Thoughts About Raspberry Pi IP Camera
In summary, setting up a Raspberry Pi surveillance camera is useful and cost-efficient to providing video surveillance for home. But if you want more, like the Raspberry Pi motion camera, or the Raspberry Pi with night vision, etc, a professional and high quality home security camera is a better choice.